Category Archives: Photography Tips

Photo Stitching

Photo Stitching

Smoky Mountains panorama in autumn
Smoky Mountains panorama in autumn © William Britten use with permission only

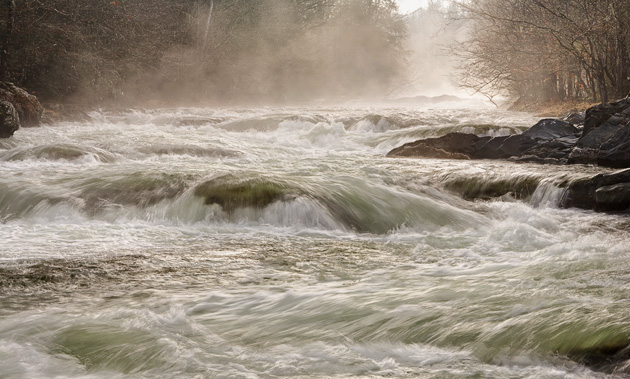
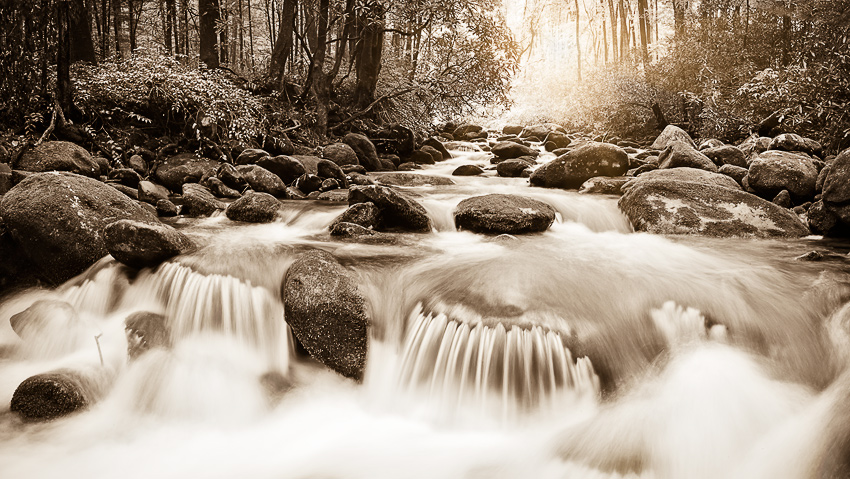
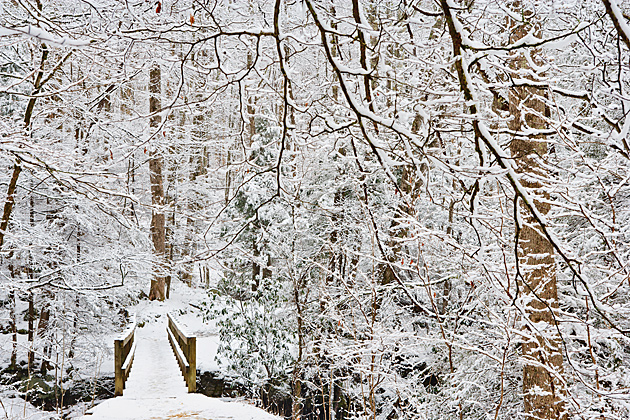
The image above was taken from the footbridge that leads to the Ramsay Cascades trail in the Greenbrier section of the Smoky Mountains. This wide panorama was created from five vertical panels joined together with a photostitch technique. And each vertical panel was created by combining four different exposures. So, the entire image that you see above is a photostitch of 20 exposures!  Click on the image above to see a larger version.

Visitors in my gallery often comment on how much easier digital photography is, compared to the old film days.  I would say that the way that professional photographers utilize digital cameras is much more complex than it was with film!

Almost every image that I work with is taken with 4 or 5 exposures, taken at different settings.  This is often referred to as “bracketing” but to me it is simply a collection of exposures made for various parts of the scene. For example, in the image above, the whites of the water needed a specific exposure setting, while the shadows in the rocks and woods required a very different setting.  Digital allows me to take many exposures of the same scene, and combine them later to give each area of the picture its own perfect exposure. At first this seemed cumbersome, but now it is an established habit when I am out working.

I often turn my camera to the vertical position and sweep across a scene, taking 3, 4, or 5 separate vertical panels, each with 4 or 5 exposures as described above. It takes some concentration to do this quickly and accurately, so that the scene does not change too much as you work your way across.  After each panel is finished by combining the multiple exposure settings, the entire panorama is photostitched together using software. Photoshop has a built in “photomerge” for this, or I also use a program called PTGui.  When a scene is changing, as it is with the flowing water above, the panoramic software has a challenge to blend the water from panel to panel to make it all blend into one image.  Wow! This is a lot of work. And digital was supposed to be so easy!

One final comment: to get a good panorama that will photostitch together well requires that your tripod stay level while you rotate across the scene. I use a special tripod head attachment from Really Right Stuff to enable this. I also use a special bracket from the same source that allows me to position the “nodal point” of the lens directly above the tripod center. In this way the camera body rotates around the lens, creating perfect panoramas.

Please stop in and visit me to see the complete display of Smoky Mountain Photography at the William Britten Gallery in Gatlinburg, TN.

Bud Ogle Place in Winter

Bud Ogle Place in Winter

Bud Ogle Cabin in Winter © William Britten use with permission only

After a snowfall followed by frigid temperatures, I was out at the Ogle Place along the Roaring Fork in the Great Smoky Mountains National Park. On this morning I was trying to keep feeling in my fingers with the temperature around 9 degrees!

Photographing scenes like the ones above and below presents a challenge of extreme lighting conditions. The sun had begun to light up the snow, producing very bright highlights, but the shadow areas on the porch were still very dark. The range of light is simply too much for the camera to record.  So, a couple of strategies were used for these pictures.  First, about 4 exposures were taken–some over exposed and some underexposed–and blended together. Second, I converted the image to black and white, and blended that in with the color version.  Since these images have little color anyway, this technique serves to add some texture to the snow, keeping it from going to solid white.

The iconic Ogle Cabin nearly burned during the fires of November 2016. The fire came right up to the back porch, which would be to the left in the photo below.

If you’re in Gatlinburg, please stop in and visit me to see the complete display of Smoky Mountain Photography at the William Britten Gallery on glades Road.

Bud Ogle Cabin in Winter © William Britten use with permission only
How to Photograph Flowing Water

How to Photograph Flowing Water

From the Chimneys Picnic area
From the Chimneys Picnic area © William Britten use with permission only

Photographing one of the many creek scenes in the Smoky Mountains presents a few challenges. First is the desire to capture the sense of flowing water, rather than water that is frozen. To do this you will need your camera on a tripod with an exposure time of one-half to three-quarters of a second. If you go much longer than this, the water will appear foamy and surreal — which may be what you want in some cases. Take a look at the two photos below of a rock in a torrent of water.  The only difference between the two is exposure time. The one on the left was taken with a slightly longer exposure time that blurred the water a little bit more. There’s really no correct way to do it … try experimenting and pick the result that most appeals to you.

Photo Tip: longer exposure
Photo Tip: longer exposure © William Britten use with permission only
Photo Tip: less exposure
Photo Tip: less exposure © William Britten use with permission only


Beautiful Flowing Water
Beautiful Flowing Water © William Britten use with permission only

Another challenge with water is the glare of harsh lighting and the danger of over-exposing the whites. The simplest solution to this problem is to photograph on cloudy or rainy days or at least find a scene that is shaded from direct sunlight. In the example to the left, a close-in composition of a small cascade avoided severe lighting conditions.

A more complicated solution to harsh lighting is to take multiple exposures (bracketing). The idea is to take one or more exposures to get your shadow areas developed, then reduce the exposure time to bring the highlights (whites) down into an acceptable range. However, you will need to know how to blend your images with software such as Photoshop.

Finally, flowing water looks very dramatic if you get down low and close to the flow. Normally, the drama is increased if the stream is coming at you as in the photo below, and the one at the top of this posting. The final image below shows a creek scene with the flow going away. To me this perspective conveys peace and tranquility. You can decide when either perspective might be more appealing.

That’s my photo tip to achieve perfect flowing water for your Smoky Mountains creek pictures.

Wild Smoky Mountains Creek
Wild Smoky Mountains Creek © William Britten use with permission only
Smoky Mountains Flowing Water
Smoky Mountains Flowing Water © William Britten use with permission only

Click on the images above for a slide-show of larger versions. Please stop in and visit me to see the complete display of Smoky Mountains Photography at the William Britten Gallery in Gatlinburg, TN.

Wildflower Photography: Coneflower Dreamscape

Wildflower Photography: Coneflower Dreamscape


Coneflower Dreamscape © William Britten use with permission only

The photograph above is the Green Headed, or Cutleaf Coneflower.  It blooms all along the roadside in the middle of summer up near Clingman’s Dome in the Great Smoky Mountains National Park .

Here’s a fun photo tip for taking a picture like the one above. One of my favorite techniques is to take the photo twice: once in a normal mode with your subject in focus, and a second time with the picture out of focus. You will need to have a camera or lens that allows you to turn the auto-focus off.  Then you will need some basic Photoshop skills to blend the two images together.  With this fairly simple technique you can create images with added depth.

The photo below is the blurred version that was blended into the image above to help create the dreamy effect.

Please stop in and visit me to see the complete display of Smoky Mountain Photography at the William Britten Gallery in Gatlinburg, TN. The Gallery is located along the historic Arts and Crafts Trail along Glades Rd.  In addition to framed and matted prints, there are magnets, mugs, and notecards to help you take a Smokies memory home.

Blurred version of the Coneflowers
Blurred version of the Coneflowers © William Britten use with permission only

impressionism prints

Variations on a Theme

Variations on a Theme

High-elevation trail in the Smokies
High-elevation trail in the Smokies © William Britten use with permission only

These three Smoky Mtns photos illustrate something about how the process of photography happens for me. All were taken on a high-elevation trail near Clingmans Dome in the Smokies. Walking along the trail, the scene above caused me to stop. Something about the elements brought on an emotional response, which is what I am usually looking for in order to create a good photograph. The well-worn path leads off into the distance of a foggy morning. The ferns are soft and welcoming – a nice contrast with the mystery of the trail. Then there’s that big old stump on the right, which will be a very nice frame for that side of the image. Finally, there are some spindly pine trees to the left, offering a frame for that side. I set up the tripod and composed the photograph above. It’s nice, but not tight enough. Too many loose distractions, which will dilute the emotional response.

So, I maneuver around, trying to get the elements into an alignment that works. How do I know if it works?  Well, you never know for sure, but a good photo will feel like it has snapped into place when you see it through the viewfinder. Sometimes it can be frustrating to find it. The image below is what “snapped” for me on this morning. This image was given the title Peace in Wild Places, and it has become a very good seller in my Gatlinburg Gallery. But there’s more to the story!  Keep reading below …

Peace in Wild Places
Peace in Wild Places © William Britten use with permission only

The image below is another interpretation of the foggy trail scene. Obviously it is very different from the one above. It stretches the emotions of the scene to an almost surreal degree. The fog-shrouded trail is very mysterious, the path is very bright, and the stump on the right has become a bit sinister. The whole scene is Hobbit-like. These two images show how a finished photograph is an interpretation, and just as a musical score can be interpreted in different ways, so can a photographic image. Perhaps the most frequent question that I am asked is “was this really the way it looked, or have you enhanced it?” The answer to both parts of that question is yes … it really did look this way, but a good photograph will take it much further than simply recording a time and place.

Please stop and see my complete collection of Smoky Mtns photos at the William Britten Gallery. I’m located along the historical Arts and Crafts Trail on Glades Rd. in Gatlinburg, TN.

Click on any of these pictures to see a larger version.

Smoky Mtns photos: impressionism
Smoky Mtns photos: impressionism © William Britten use with permission only
The Roaring Fork in Black and White

The Roaring Fork in Black and White

Sunrise on the Roaring Fork
Sunrise on the Roaring Fork © William Britten use with permission only

Lately I’ve become hooked on black and white conversions. A couple of weeks ago I posted some black and white Smoky Mountains photos from Cades Cove. Today’s offerings are from along the Roaring Fork.

In the digital era the camera’s sensor records everything in color. Unlike the monochromatic film of yore, you must start with a color image and then do a conversion. But the basics of black and white photography have not changed. Not every scene lends itself to a monochrome presentation. All you have to work with are shades of gray and dark and light. It’s all about contrasts in the areas of light. I think that photos of creeks are good candidates, especially the boulder-strewn Roaring Fork. The natural colors here are mostly whites of the water and grays of the rocks, so you have a lot of neutral shades to work with. Add some dramatic lighting, and you might just have a great black and white photo. The photos on this page were converted using Lightroom, including the addition of a sepia tone that gives each image a warm coloring.

Recently I’ve added some black and white panoramas to my gallery of Smoky Mountains photos. These, and all of my Smokies landscapes are on display at the William Britten Gallery along the historic Arts and Crafts Trail on Glades Rd. in Gatlinburg.

Smoky Mountains photos: Roaring Fork Morning
Smoky Mountains photos: Roaring Fork Morning © William Britten use with permission only
Cades Cove in Black and White

Cades Cove in Black and White

Cades Cove panorama in toned monochrome
Cades Cove panorama in toned monochrome © William Britten use with permission only

Lately I’ve been inspired to convert some of my Smoky Mountains photos to black and white. There are many ways to do this, including software such as Silver Efex or Photoshop. I am a big fan of Lightroom for many reasons, and it has built in conversion that works fine. I like to add a tone to simulate the old wet toners that used to be added in the darkroom.  The photos on this page were all given a sepia tone. Dodging and burning is also very useful when working in monochrome, since it’s only the shades of grey that you have to work with.  All of these photos had some areas lightened and some areas darkened by using a Photoshop layers technique.

I also tend to do a lot of local contrast adjustment. Again, there are a lot of software programs that will do this, which is basically creating more separation along the borders of darks and lights. I do this to some degree for virtually every photo, but for black and white it seems even more important.

John Oliver Cabin
John Oliver Cabin © William Britten use with permission only

These photos were all taken in Cades Cove and were converted from the original raw image file. The panoramic on the top of the page was stitched from several files. The shot from Hyatt Lane below was taken at the same time as one of my Featured Photos, Cades Cove Morning. You can compare the two to see the difference color makes.

If you’re in Gatlinburg, come on out to Morning Mist Village along the historic Arts and Crafts loop on Glades Rd. My complete display of Smoky Mountains photos is on display at the William Britten Gallery, along with some nifty magnets, mugs, and notecards. Maybe a special something to take home.

Smoky Mountains photos in black and white
Smoky Mountains photos in black and white © William Britten use with permission only
Wildflower Photography Tips

Wildflower Photography Tips

Photo Tip for wildflowers
Photo Tip for wildflowers © William Britten use with permission only

Updated 2012: This blog post was originally written two years ago, in spring of 2010. The information here is still very valid and useful, but in the past couple of years I’ve adopted a more “minimalist” approach to photography, and especially wildflower photos. The main difference is that I’m now using a very lightweight camera, which I find very enjoyable for Smoky Mountains hiking. I currently use a Panasonic Lumix GH2, which is a micro-four-thirds system. This allows me to carry a camera with a 600mm equivalent lens in the palm of one hand! This is fabulous for all kinds of photography, especially wildlife and wildflower photos.

So, although I still use the system pictured above for serious wildflower portraits — a full-frame Canon DSLR with ring-flash and tripod — my every day gear these days is the small GH2 on a monopod (which doubles as my hiking stick!) with the 14-140 lens. This gives me a 28-280 zoom in 35mm equivalent terms, and I find it gives very good results for wildflower close-ups. I’ve added a typical shot from this camera/lens at the bottom of this page. It doesn’t give you that classic “macro” look with the extreme narrow depth of field, but it gives very good results … and it’s so much fun to use! And I still wouldn’t leave home without the 12″ LiteDisc in my back pocket!

There are several issues to consider when photographing wildflowers in the Smoky Mountains. First, many of them are tiny, so to get a real good portrait you will need a macro lens. I find that the 100mm is most useful, although I also use a 180mm. In general, macro lenses are reasonably priced and tend to be of very high quality.

Second, although it may seem counter-intuitive, the sun is not your friend. A flower bathed in direct sunlight will be harshly lit with shadows that are too dark for your camera to contend with. There are exceptions to this of course, such as the golden, syrupy light of early morning or sunset. But in general, you will want something  to shade the plant. I carry a 12″ disc called a LiteDisc by Fotoflex, which will collapse into a small disc that fits in my back pocket. You can get one that is silver on one side (pictured above) and gold on the other side. These can also be used to reflect light into the scene. Or you can get a translucent disc that will turn direct sunlight into a diffused, soft light. Or you might just try an umbrella!

Third, now that you have blocked the sunlight, you will need to provide your own light. In the picture above you can see a ring flash attached to the front of my macro lens. The advantage of the ring flash is that the camera will automatically bathe the flower in a perfect light, giving you great exposures every time. You will not be able to get the same effect from a normal flash attachment.  An alternative to the ring flash is a small portable “soft box.”  Or the no-cost solution would be to go out on rainy days. But most of the time you will have no control over the lighting conditions, so by carrying these items you will always be able to create a perfect lighting environment.

Fourth, the problem that is the most difficult to solve is wind. Again, these are tiny, delicate blossoms, and you are down on your hands and knees with a magnifying lens. You’ve carefully composed a perfect view of this miniature world, and suddenly those little plants start waving about in just a slight breeze. There’s not much to do except wait it out. Stick your eyes in the viewfinder until your knees give out, and if there is just a second or two of calm, snap the picture. Also, early mornings tend to be calmer, and as the day heats up it creates air currents. Also, if the forecast is for wind or an approaching storm front, postpone your trip if you can.

In the photo above I was interested in the little white Star Chickweed blossoms in a clump underneath the Yellow Trillium on the Chestnut Top Trail. Below is the final image. Click on the image above or below for a larger version.

That’s my photo tip for getting great wildflower pictures. Please stop in and visit me to see the complete display of Smoky Mountain Photography at the William Britten Gallery in Gatlinburg, TN.

Star Chickweed © William Britten use with permission only
White Erect Trillium taken with Panasonic GH2
Smoky Mountains Impressionism

Smoky Mountains Impressionism

Along the Kephart Prong Trail
Along the Kephart Prong Trail © William Britten use with permission only

Today’s photography tip is about impressionism and experimentation. I’ve tried Impressionism in my Smoky Mountains photography before, as in Smoky Mountains Monet.

All of the photos here were taken with the camera hand-held, with no special Photoshop filters added and no manipulation in a Paint program. All of these effects were created by experimenting with camera movement during a 2-3 second exposure. Here’s how they were done:

Appalachian Trail near Clingmans Dome
Appalachian Trail near Clingmans Dome © William Britten use with permission only

First, it’s not always easy to get a long exposure on  a sunny day. If you stop your camera down to f16 or f22 you may still have an exposure that is too short to allow camera movement. For these photos, I attached a strong neutral density filter that blocks much of the light. In fact, at f22 I had about a 6 second exposure, which was too long!

Second, just experiment with movement.  In general, go with the lines in the scene. If the lines are vertical, such as trees, move the camera up and down during the exposure.  If the lines are horizontal, such as the horizon at the beach, move side to side. And if there is a central point of interest, try rotating around it, as in the two photographs below.  This takes some practice with a hand-held camera. I found that when rotating, it was best to move slowly.

Smokies Footbridge Makes My Head Spin!
Smokies Footbridge Makes My Head Spin! © William Britten use with permission only

To get these few winners, I took a few hundred shots. But I shoot very quickly, one after another, adjusting the movements and timing while watching the results. In this way I can learn about what movements work best and zero in on a good technique.

Is this worthwhile photography, or just a gimmick? Well, it is very fun, so why not? But also, playing with light and learning to use light in creative ways is at the heart of photography. A technique like this, used on the right subject, can help convey the mood and the feelings and the essence. For example, out at the William Britten Gallery in Gatlinburg,  Winter Silence is a Smoky Mountains scene created with impressionism, and it is a top-seller because it somehow captures the essence of snow and solitude.

Modern Impressionism on a Smoky Mountains Trail
Modern Impressionism on a Smoky Mountains Trail © William Britten use with permission only

impressionism photos

The World Within the World

The World Within the World

Where is the World Within?

Friday philosophy time combined with a photo tip … a two-fer-one!

For me, so much of photography is about seeing the world within the world. Most photographs don’t jump out of the jumble in front of our eyes and say “here I am, take me!” Some do, but mostly not. Instead, I think of them as the answer to the question: if one piece of this scene before me was the entire world, what would it feel like? What would it have to say? What would be the essence?

One of my images that always seems to spark a response is Smoky Mountain Monet. This picture is hardly more than a puddle in the middle of the forest. I almost didn’t bother to stop, but the reflection in the water caught my eye. Despite its humble appearance, within that small world is all of autumn, with its colored leaves and smells and feelings and memories.

When you think about it, life is like that. So many deeply meaningful moments pass by within the context of ordinary life. And our actions that may significantly touch a loved one, or friend, or stranger, happen in the midst of hundreds of ordinary actions in an ordinary day.

So, back to the photo above. A winter panorama of downtown Gatlinburg. The Presbyterian church and the Fire Station down at the bottom left. The motels and the parking lot we always use during art fairs. The Park Vista Hotel in the distance, with the Smoky Mountains beyond.  Does this scene have a world within?

The World Within © William Britten use with permission only

Yes!  Grab the telephoto, reach up into the mountains, and you’re miles away from civilization in a majestic winter wilderness. Ominous dark clouds threatening another snowstorm. A scene that would elicit emotions from most viewers.

As always, the water is hot for coffee or tea out at the William Britten Gallery on Glades Rd. in Gatlinburg, TN. Stop in to see the complete display of Smoky Mountain Photography.

Photo Tip: Winter Blues

Photo Tip: Winter Blues

Winter Scene with Blue Cast © William Britten use with permission only

Photographs of winter scenes, especially on cloudy days, often have too much blue. How much is too much is of course subjective, and you might want to emphasize the coldness of the scene with a blue cast. But it’s still good to be aware of the tendency for winter shots to look blue. If you compare the photo above, taken recently out in the Greenbrier section of the Great Smoky Mountains National Park, to the same scene below, you will notice the difference in color tone. The one above has a very noticeable blue cast.

This is a photography issue of color balance, or white balance. Just as winter scenes tend to be too dark because the generic setting of the camera is expecting an average brightness, the camera settings are also expecting an average color balance. In a scene that’s skewed towards white, the camera is fooled, and the result is too much blue.

Actually, color balance is a year round issue for a serious photographer, but winter is especially extreme. What to do about it? If you are serious about photography, do a web search on “color balance” or “white balance” and study the issues. There are white balance targets available which allow you to take a photo of the target, which can then be used to calibrate all the other shots taken under the same conditions. There are also white balance calibration tools built into popular photography software such as Photoshop, Lightroom, Aperture, etc. This short blog post should at least point you in the right direction of reading up on the issue of color balance if you find yourself frustrated with your photos.

Notice how balancing the blue with all the other colors in the photo below brings out the green that was in the water and the browns of the bare trees.

Color Corrected Winter Scene © William Britten use with permission only

As always, please stop in and visit me at the William Britten Gallery in Gatlinburg, TN to see the complete display of Smoky Mountain Photography.

More Greenbrier in Winter

More Greenbrier in Winter

Ramsay Cascades Trail in Winter © William Britten use with permission only

Yesterday’s Greenbrier in Winter photo was so pretty that I had to do some more. Both of these are along the trail to Ramsay Cascades.  The one above is the footbridge at the trail head, and the one below is on up the trail a bit.  A nice wet slow that really clung to the trees and branches made for a winter dreamscape.

Just a quick photo tip … cameras left on auto settings will usually produce dark snow scenes.  This is simply because cameras are set to interpret a scene as average brightness, and a snow scene is much brighter.  So if you can set your camera to overexpose by three clicks or so, you’ll get the snow looking more naturally bright.

The complete display of Smoky Mountain Photography is available at the William Britten Gallery in Morning Mist Village on Glades Road in Gatlinburg, TN. Please stop in and visit when you are visiting the Smoky Mountains.

Ramsay Cascades Trail in Winter © William Britten use with permission only
Festival of Trees

Festival of Trees

The World Within the Ornament © William Britten use with permission only

Happy Friday everyone!  I recently took a break from our craft fair and stopped in at the Gatlinburg Festival of Trees, at the Mills Center just after Thanksgiving. In the picture above you might be able to see my reflection in the ornament, with the trees all around me. Very M.C. Escher, isn’t it?

In my photography I seem to be drawn to worlds within the world, the miniature landscapes that might go unnoticed. As I roamed around the Festival Of Trees, the sponsors of the event became curious, and asked me several times what I was doing. They encouraged everyone to photograph the trees, but I was down on my knees, zeroed in on something that  caught my eye, never took a single photo of an entire tree!  It intrigues me to think about what a small segment will look like if it is presented as the entire world.

Christmas Ornament © William Britten use with permission only

It’s December in Gatlinburg, and the Smoky Mountains are looking somewhat cold and barren. So we turn our attention to the sparkle and lights of the Christmas season. More on that in the days to come ….

It’s a wonderful time to visit the Smokies. If you can get away, please stop in and visit me to see the complete display of Smoky Mountain Photography at the William Britten Gallery out on Glades Rd. along the Arts and Crafts Trail.

Christmas Ornament © William Britten use with permission onlyChristmas Ornament © William Britten use with permission only
Christmas Ornament © William Britten use with permission only
Zoom tricks

Zoom tricks

Zoom tricks © William Britten use with permission only

Here’s a simple photography technique that can jazz up an image.  You’ll need to stop your zoom lens down as far as it will go, to F22 or more.  The idea is to get a long exposure, of at least one second or more. Then while the camera is exposing the image, twist the zoom lens to create the effect seen above. Even better is to create two exposures … one with the zoom effect and one a normal exposure. Blend them together to add just as much of the effect as you want.

The image above is Smoky Mountain Magic with the zoom effect added. I used the same effect with the Chapels of Love pictures.

Please stop in and visit me to see the complete display of Smoky Mountain Photography at the William Britten Gallery in Gatlinburg, TN.

Signup for our occasional newsletter

Enter your details below and we'll keep you updated via email.

Content Protected Using Blog Protector By: PcDrome.